Intro and Brief Recap
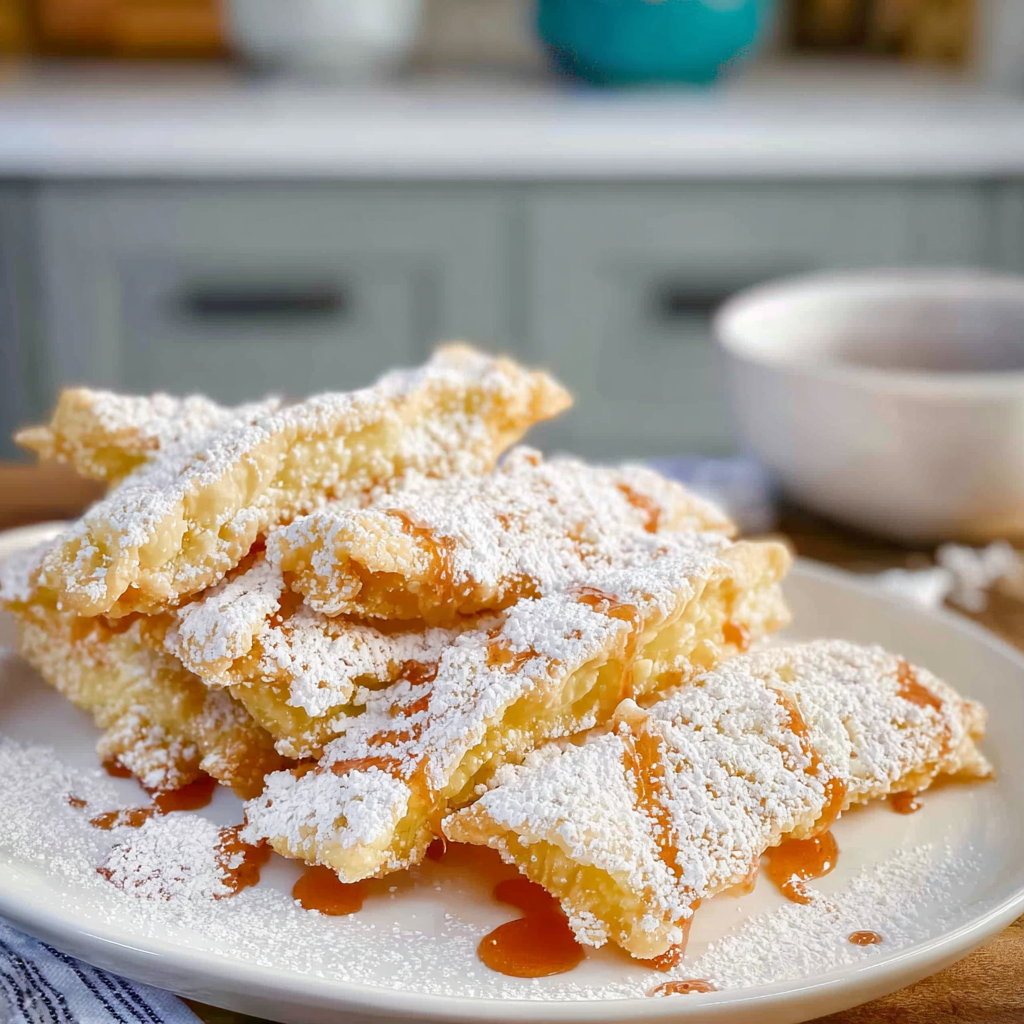
Have you ever tasted a dessert that transports you straight to Italy with just one bite? Italian Crostoli, with their delicate, crispy texture and sweet, airy flavor, offer an irresistible treat. These delightful pastries are often dusted with powdered sugar, making them perfect for any occasion. Whether you’re indulging during the holidays or enjoying them at a casual gathering, these treats promise an unforgettable experience.
As I recall my grandmother’s kitchen filled with laughter and the warm aroma of frying dough, I can’t help but smile. Every holiday season, she would prepare a batch of Crostoli, inviting family and friends to gather around the table. The crispy edges and soft centers encapsulated the essence of love and tradition. It’s a recipe that has been passed down through generations, bringing joy to everyone who takes a bite. Get ready to learn how to create these delightful Italian pastries that will surely become the star of your dessert table!
Key Ingredients For Italian Crostoli
Here’s what you’ll need to make this delicious dish:
- All-Purpose Flour: This is the base for your dough; choose high-quality flour for the best texture.
- Sugar: Granulated sugar adds sweetness; adjust the amount based on your taste preference.
- Eggs: Fresh eggs provide richness and help bind the ingredients together.
- Butter: Use unsalted butter for a rich flavor; make sure it’s softened for easy mixing.
- Lemon Zest: Freshly grated lemon zest enhances the flavor profile with a bright citrus note.
- Salt: A pinch of salt balances the sweetness; don’t skip this crucial ingredient.
- Powdered Sugar: For dusting on top; it gives your Crostoli a beautiful finish.
The full ingredients list, including measurements, is provided in the recipe card directly below.
Instructions For Italian Crostoli
Follow these simple steps to prepare this delicious dish:
First Step : Prepare the Dough
In a large mixing bowl, combine all-purpose flour and sugar. Create a well in the center and add eggs, softened butter, lemon zest, and salt. Mix until combined and form into a smooth dough. If it’s too sticky, add small amounts of flour until manageable.
Second Step : Roll Out the Dough
Divide the dough into smaller portions for easier handling. On a floured surface, roll out each portion as thinly as possible—ideally about 1/8 inch thick—to achieve that signature crispiness.
Third Step : Cut into Shapes
Using a sharp knife or pastry cutter, slice the rolled dough into diamond or rectangular shapes. Make sure each piece has a small slit in the center—this will help them puff up while frying.
Fourth Step : Heat Oil
In a deep frying pan or pot, heat vegetable oil over medium-high heat until it reaches about 350°F (175°C). To test if it’s ready, drop in a small piece of dough; it should sizzle immediately.
Fifth Step : Fry the Dough
Carefully place several pieces of cut dough into the hot oil without overcrowding. Fry until golden brown on both sides—this should take about 2-3 minutes per side. Use a slotted spoon to transfer them onto paper towels to drain excess oil.
Sixth Step : Dust with Powdered Sugar
Once cooled slightly but still warm, dust generously with powdered sugar before serving. This final touch adds sweetness and an appealing look.
Transfer to plates and serve warm for an amazing treat that everyone will adore!
Expert Tips
Here are some helpful tips to ensure the best results for your dish:
- Resting Time: Allowing your dough to rest for at least 30 minutes makes it easier to roll out.
- Consistency Check: Ensure your oil is hot enough by testing with small pieces of dough before frying larger batches.
- Dough Thickness: Rolling out thinner dough leads to crispier Crostoli; be patient while rolling!
These expert tips will help you achieve perfectly crispy Italian Crostoli every time! Enjoy baking!
Preparation Tips for Italian Crostoli
To create the perfect Italian Crostoli, start with high-quality ingredients. Use fresh eggs for richness and a fine flour for a light texture. When rolling out the dough, aim for a thin consistency; this will ensure that your crostoli are crispy and delicate after frying. Additionally, let the dough rest for at least 30 minutes before cutting it into shapes, as this helps to relax the gluten and makes it easier to work with.
Pay attention to the frying temperature; oil that is too hot will burn the crostoli while oil that is too cool will make them greasy. A temperature around 350°F (175°C) is ideal for achieving that golden-brown color. Finally, after frying, drain the crostoli on paper towels to remove any excess oil and sprinkle them with powdered sugar while they are still warm.
Serving Suggestions
Italian Crostoli can be enjoyed in various ways. They are delightful as a dessert or a sweet snack during festivities. Serve them dusted with powdered sugar for a classic look. You can also pair them with fresh fruit or a scoop of gelato for an indulgent treat.
For an innovative twist, consider drizzling melted chocolate over the crostoli or serving them with a side of fruit compote. Their crispy texture complements creamy dips like mascarpone cheese mixed with vanilla and citrus zest. Whether enjoyed plain or dressed up, these treats will surely impress your guests.
Storage Instructions
To keep your Italian Crostoli fresh, store them in an airtight container at room temperature. They will typically stay crisp for up to three days when stored correctly. If you want to preserve their crunchiness longer, consider freezing them. Place cooled crostoli in a single layer on a baking sheet and freeze until solid before transferring them to a freezer-safe bag or container.
When ready to enjoy, simply thaw at room temperature or reheat in an oven preheated to 350°F (175°C) for about five minutes. This method helps restore their delightful crunchiness.
Presentation Ideas
This Italian Crostoli is versatile and pairs wonderfully with:
- Fresh Berries: Serve alongside strawberries or raspberries for a refreshing contrast.
- Creamy Dips: Pair with mascarpone or whipped cream flavored with vanilla.
- Chocolate Sauce: Drizzle over warm crostoli for an extra decadent experience.
FAQs
What is the origin of Italian Crostoli?
Italian Crostoli has deep roots in Italian culinary traditions. This sweet treat originated in regions such as Veneto and Friuli Venezia Giulia but has spread throughout Italy due to its popularity during festivals and celebrations. Traditionally made during Carnevale season, they often symbolize joy and festivity. The name “crostolo” derives from the term “crosta,” meaning crust, which references their crispy exterior.
Can I make Italian Crostoli ahead of time?
Yes, you can prepare Italian Crostoli ahead of time! Make the dough and cut it into shapes one day prior, then refrigerate it until you’re ready to fry. Alternatively, you can fry them in advance and store them in an airtight container at room temperature for up to three days or freeze them for longer storage. Just remember to reheat properly before serving to maintain their crispiness.
Are there variations of Italian Crostoli?
Absolutely! While traditional Italian Crostoli is typically sweet and dusted with powdered sugar, you can experiment with flavors by adding citrus zest like lemon or orange directly into the dough. Some variations include using wine instead of rum or adding spices such as cinnamon or nutmeg for warmth. Each region may have its own take on this classic recipe!
How do I achieve crispy Italian Crostoli?
Achieving perfectly crispy Italian Crostoli relies on several factors: rolling the dough thinly allows for optimal frying while controlling oil temperature ensures they cook evenly without soaking up excess grease. Frying in small batches prevents overcrowding and promotes even cooking resulting in that desired crunchy texture that makes crostoli so irresistible!
Italian Crostoli
Indulge in the delightful sweetness of Italian Crostoli, a traditional pastry that embodies the essence of Italy. With their crispy edges and soft centers, these treats are perfect for any occasion, dusted with powdered sugar for an irresistible finish. Easy to make and sure to impress, they are a family favorite that will transport you straight to your grandmother’s kitchen.
- Prep Time: 30 minutes
- Cook Time: 15 minutes
- Total Time: 45 minutes
- Yield: Approximately 12 servings 1x
- Category: Dessert
- Method: Frying
- Cuisine: Italian
Ingredients
- 2 cups all-purpose flour
- 1/4 cup granulated sugar
- 2 large eggs
- 1/4 cup unsalted butter (softened)
- Zest of 1 lemon
- 1/4 tsp salt
- Powdered sugar (for dusting)
Instructions
- Prepare the Dough: In a mixing bowl, combine flour and sugar. Create a well in the center and add eggs, softened butter, lemon zest, and salt. Mix until a smooth dough forms; adjust with more flour if too sticky.
- Roll Out the Dough: Divide dough into smaller portions. On a floured surface, roll out each portion to about 1/8 inch thick.
- Cut into Shapes: Slice rolled dough into diamond or rectangular shapes, making a small slit in the center of each piece.
- Heat Oil: In a deep frying pan, heat vegetable oil to approximately 350°F (175°C). Test with a small piece of dough; it should sizzle upon contact.
- Fry the Dough: Carefully add pieces of dough to hot oil without overcrowding. Fry until golden brown on both sides (about 2-3 minutes per side). Drain on paper towels.
- Dust with Powdered Sugar: While still warm, generously dust with powdered sugar before serving.
Nutrition
- Serving Size: 2 pieces (50g)
- Calories: 210
- Sugar: 6g
- Sodium: 125mg
- Fat: 10g
- Saturated Fat: 5g
- Unsaturated Fat: 4g
- Trans Fat: 0g
- Carbohydrates: 27g
- Fiber: 1g
- Protein: 3g
- Cholesterol: 70mg