Intro and Brief Recap
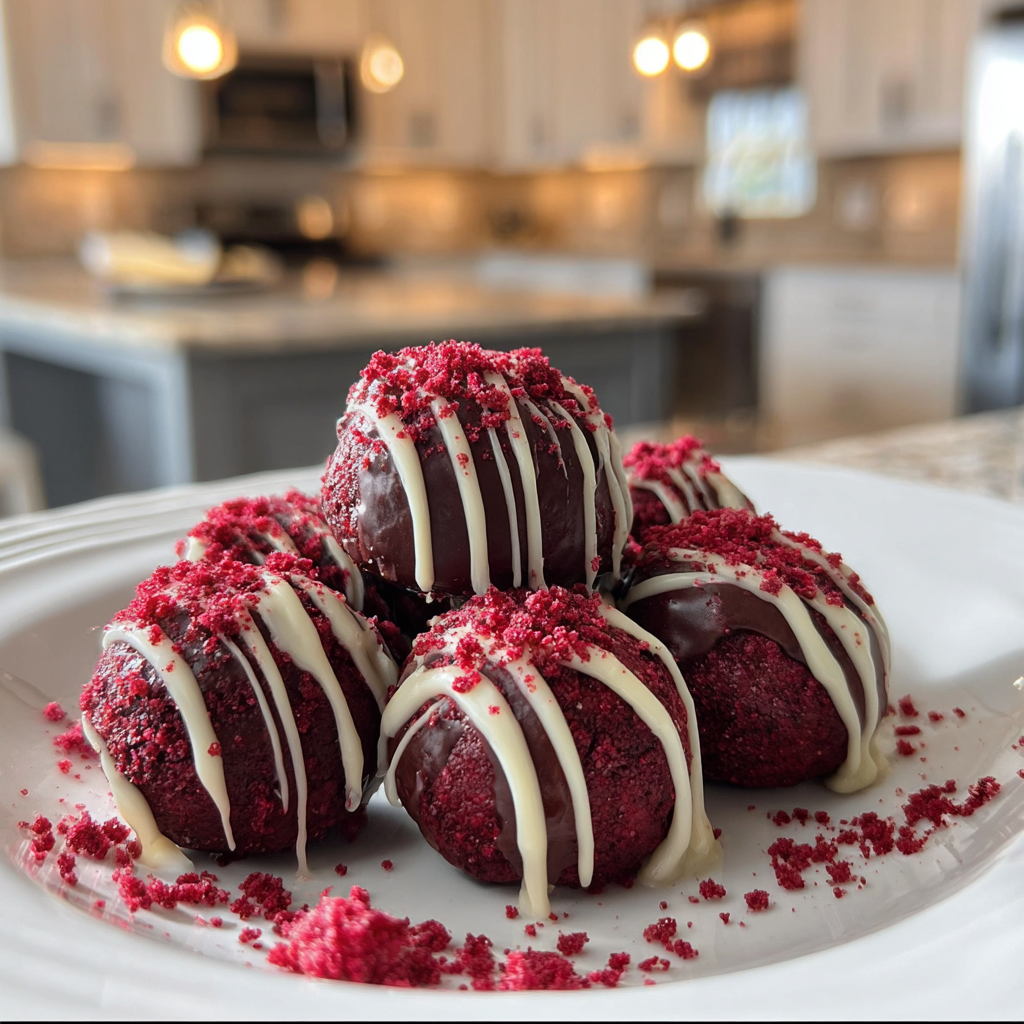
Have you ever indulged in the rich, velvety taste of red velvet cake? Imagine that same delightful flavor transformed into bite-sized treats. Red velvet cake balls are a perfect combination of moist cake and creamy frosting, all enrobed in a luscious chocolate coating. These sweet morsels not only satisfy your cravings but also ignite joy at any gathering.
My first experience with red velvet cake balls was during a friend’s birthday party. As I took my first bite, the soft texture melted in my mouth while the hint of cocoa danced on my palate. These cake balls quickly became a favorite for celebrations, from anniversaries to holiday parties. The vibrant red hue and decadent chocolate flavor create an irresistible treat that everyone will love. Whether you’re making them for a special occasion or just because, these cake balls promise an explosion of flavor that will keep you coming back for more.
Key Ingredients For Red velvet cake balls
Here’s what you’ll need to make this delicious dish:
- Red Velvet Cake Mix: This is the base of your cake balls; opt for a high-quality mix for the best flavor.
- Eggs: You’ll need two large eggs to help bind the cake mix together.
- Vegetable Oil: Use about half a cup to add moisture and richness to your cake.
- Water: Follow the instructions on the cake mix package, usually around one cup.
- Cream Cheese Frosting: This will be mixed with the baked cake to create that signature creamy texture.
- Chocolate Coating: Use melting chocolate or candy melts to coat your cake balls evenly.
The full ingredients list, including measurements, is provided in the recipe card directly below.

Instructions For Red velvet cake balls
Follow these simple steps to prepare this delicious dish:
First Step : Bake the Cake
Preheat your oven to 350°F (175°C). In a large mixing bowl, combine the red velvet cake mix, eggs, vegetable oil, and water. Whisk until smooth and pour into a greased baking pan. Bake according to package instructions, typically for about 30 minutes.
Second Step : Cool and Crumble
Once baked, remove the cake from the oven and let it cool completely in the pan for about 10-15 minutes. After cooling, transfer it to a wire rack. Once cooled fully, crumble the cake into fine pieces using your hands or a fork.
Third Step : Mix with Frosting
In a separate bowl, take your cream cheese frosting and add it gradually to the crumbled cake. Mix thoroughly until combined; it should form a dough-like consistency that holds together when rolled.
Fourth Step : Shape into Balls
Using your hands, take small portions of the mixture and roll them into bite-sized balls, roughly one inch in diameter. Place each ball onto a parchment-lined baking sheet as you go.
Fifth Step : Chill Before Coating
Refrigerate the shaped balls for at least one hour. This step firms them up and makes them easier to coat with chocolate later.
Sixth Step : Coat with Chocolate
Melt your chocolate coating according to package instructions. Dip each chilled ball into the melted chocolate until fully coated, then place back on parchment paper. Allow them to set completely before serving.
Transfer to plates and enjoy these delightful red velvet cake balls as an irresistible dessert!
Expert Tips
Here are some helpful tips to ensure the best results for your dish:
- Use Quality Ingredients: Opt for premium ingredients like real cream cheese frosting for richer flavor.
- Chill Thoroughly: Ensure that you chill your dough well before coating; this prevents melting during dipping.
- Add Sprinkles for Fun: Consider decorating with sprinkles or crushed nuts after coating for added texture and visual appeal.
Presentation Ideas
This Red velvet cake balls recipe is versatile and pairs wonderfully with:
- Cream Cheese Frosting – A drizzle or dip in cream cheese frosting adds an extra layer of flavor. The tanginess perfectly complements the sweetness of the cake balls.
- Chocolate Ganache – Dipping your cake balls in rich chocolate ganache creates a decadent treat. Opt for dark chocolate for a beautiful contrast against the vibrant red.
- Edible Glitter – For a festive touch, sprinkle some edible glitter on top. This adds visual appeal and makes your dessert perfect for special occasions.
Storage Tips
To keep your Red velvet cake balls fresh, store them in an airtight container. They can last up to one week in the refrigerator. If you want to make them ahead of time, consider freezing them. Place them on a baking sheet to freeze individually before transferring to a freezer-safe bag. They can remain frozen for up to three months.
Variations to Try
Experimenting with flavors can elevate your Red velvet cake balls. Here are some delightful variations:
– Add a splash of vanilla extract into the mixture for a deeper flavor profile.
– Incorporate crushed nuts like pecans or walnuts for added crunch.
– For a twist, consider using white chocolate instead of traditional chocolate coatings.
Serving Suggestions
Red velvet cake balls make an excellent addition to any gathering. Consider serving them at birthday parties, weddings, or holiday celebrations. Pair these treats with coffee or hot cocoa for a cozy afternoon snack.
Nutritional Information
While indulging in Red velvet cake balls, it’s essential to be mindful of portion sizes. Each ball typically contains around 150 calories, depending on the ingredients used and portion size. If you opt for healthier substitutions, like reduced-fat cream cheese or alternative sweeteners, you can enjoy these treats guilt-free.
FAQs
What is the best way to decorate Red velvet cake balls?
Decorating Red velvet cake balls can enhance their visual appeal and taste. One popular method involves dipping them in melted chocolate and topping with sprinkles or edible glitter. You can also drizzle cream cheese frosting over them for added flavor and decoration. Experimenting with different colors of candy melts can create beautiful contrasts that are perfect for themed events.
Can I make Red velvet cake balls gluten-free?
Yes, you can easily adapt this recipe to be gluten-free by substituting regular flour with a high-quality gluten-free flour blend. Ensure that all other ingredients are also gluten-free, including any coatings or toppings you plan to use. This way, everyone can enjoy these delightful treats without compromising their dietary needs.
How long do Red velvet cake balls last?
Red velvet cake balls can last about one week when stored properly in an airtight container in the refrigerator. For longer storage, consider freezing them; they will keep well for up to three months if wrapped securely to prevent freezer burn. Simply let them thaw at room temperature before serving.
Can I customize fillings inside my Red velvet cake balls?
Absolutely! You can customize your Red velvet cake balls by adding different fillings such as cream cheese, chocolate ganache, or even fruit preserves inside each ball before coating them. This not only enhances the flavor but also adds an exciting surprise element when someone takes a bite!
Red Velvet Cake Balls

Indulge in the delightful fusion of flavors with these Red Velvet Cake Balls, featuring a moist red velvet cake blended with creamy cream cheese frosting, all coated in rich chocolate. Perfect for celebrations or a sweet treat, these bite-sized delights are sure to impress at any gathering.
- Prep Time: 20 minutes
- Cook Time: 30 minutes
- Total Time: 50 minutes
- Yield: Approximately 24 servings 1x
- Category: Dessert
- Method: Baking
- Cuisine: American
Ingredients
- 1 box (15.25 oz) Red Velvet Cake Mix
- 2 large Eggs
- ½ cup Vegetable Oil
- 1 cup Water
- 1 cup Cream Cheese Frosting
- 12 oz Chocolate Coating (melting chocolate or candy melts)
Instructions
- Preheat your oven to 350°F (175°C). In a large bowl, mix the cake mix, eggs, vegetable oil, and water until smooth. Pour into a greased baking pan and bake for about 30 minutes, or as directed on the package.
- Allow the cake to cool in the pan for 10-15 minutes before transferring it to a wire rack to cool completely. Once cooled, crumble the cake into fine pieces using your hands.
- In a separate bowl, gradually combine the crumbled cake with cream cheese frosting until a dough-like consistency forms.
- Roll small portions of the mixture into balls about one inch in diameter and place them on a parchment-lined baking sheet.
- Chill the cake balls in the refrigerator for at least one hour to firm up.
- Melt the chocolate coating as per package instructions. Dip each chilled ball into the melted chocolate until fully coated and return them to parchment paper to set.
Nutrition
- Serving Size: 1 serving
- Calories: 150
- Sugar: 13g
- Sodium: 100mg
- Fat: 7g
- Saturated Fat: 3g
- Unsaturated Fat: 4g
- Trans Fat: 0g
- Carbohydrates: 19g
- Fiber: 0g
- Protein: 2g
- Cholesterol: 20mg